Wednesday, January 16, 2013

The Yellow Brick Road

Believe it or not, this project is not dead; it's just in a coma. But there are signs of possible waking up.

The Papercraft direction, though still a direction I like in concept, has some practical problems. Durability is a concern. And frankly, just coming up with viable hex designs has been a long and arduous process; let alone actually unfolding the 3D models into flat templates, then skinning them appropriately, then printing and building them. The most appealing aspect of the papercraft board concept is the price; it would be very economical to create.

However, today, I discovered something really cool that has me thinking of creating the board in a totally different way. I can sum up the concept in one word... LEGO! Behold this LEGO Settlers of Catan board:
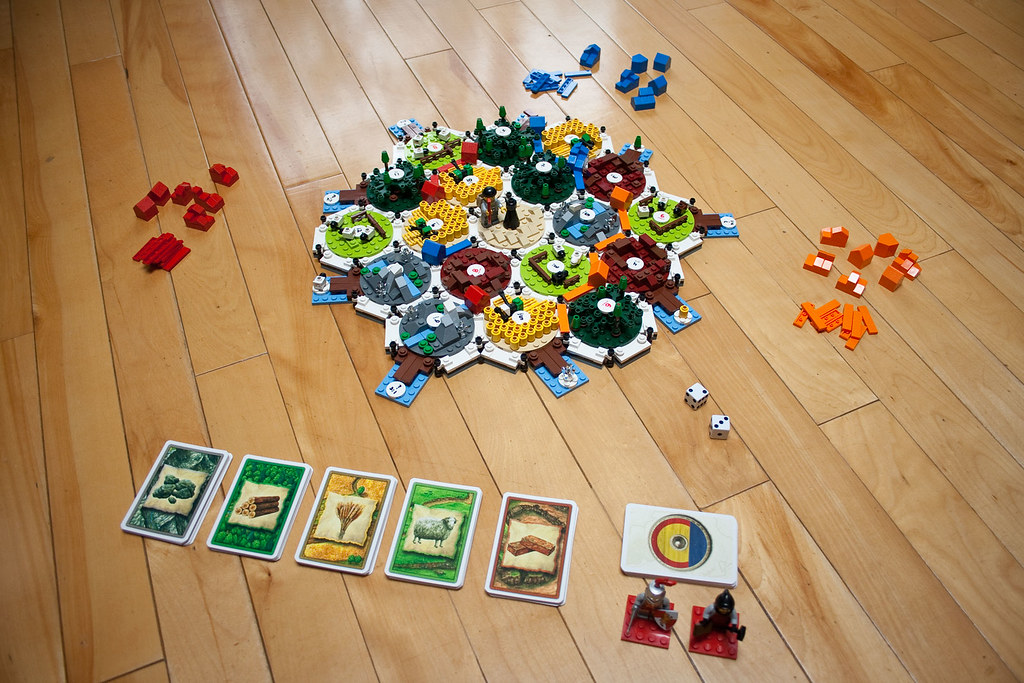

How cool is that?! the 'hex tiles' are actually round in this case, being built on 6x6 round plates. More photos can be found at Michael Thomas' (the creator of this here LEGO SoC board) flickr stream.

Just from the photos, it's fairly easy to figure out how it's built and the pieces required.

Although it's a significantly more expensive board option than the papercraft, it would be significantly easier to build and also be much more durable. The biggest challenge in creating this kind of board would be purchasing all the required pieces; but bricklink.com and various other online resources would be very helpful there.

So, this have now become my new direction on this project; and heck, I may even decide to redesign the cards for a LEGO-centric theme. But that's a decision I'll save for later.

Wednesday, June 30, 2010

Seeing the Forest for the Trees

I managed to do a whole lot more modelling of the papercraft hexes and such recently. So much so, in fact, that I've essentially completed the 3D modelling of the hexes; though I may revisit one or two models to clean them up a bit.

My remaining hexes were the Fields, Forests, Seas, and Harbours. They are now done; here they are for you viewing pleasure.


Keep in mind that these models are not showing their final skins; they're merely showing their shape. The actual final skins will be drawn onto them, using Inkscape, after they're unfolded.

And so, now there are two possible avenues for continuing work. I can either continue to finalize the hexes by going through the unfolding process and then importing them to Inkscape to skin them; or I can continue the modelling work by constructing the playing pieces - the roads, villages, cities, hex number blocks, resource type blocks, and so on.

I'm in the 3D modelling groove right now; so I think I'm leaning towards the latter course of action.

Thursday, June 24, 2010

Climb Every Mountain,...

I figured it wouldn't take me very long to finish my 3D model for the mountains hex; and I was right. This hex is the tallest one of the bunch. I tried to create a semblance of snow caps at the peaks; but there's only so much I can do with the basic Sketchup features. I'll be drawing on some proper snow caps once I import the unfolded pattern into Inkscape for final skinning.


With the mountains done, I'm left with fields, forests, harbors, and the border seas to do. I haven't decided which I'm going to tackle next. I might do fields next.

The Hills DO NOT Have Eyes!

I finished the 3D model for the Hills hex today. Check it out...


I'll probably eventually design some tiny little sheep to go onto the hill; but that's detail work for later.

For now, I've moved on to building the model for the mountains. I've got the wireframe finished; my next steps are to draw 3D Faces onto the wireframe and then import it into Sketchup. I'll probably have a pic of that model soon.

Tuesday, June 22, 2010

I Am the Very Model of a Modern... Hex?!

Over the past few days, I've been working on building the 3D Models for my Papercraft parts for the game. I've started with the board hexes. I've completed the models for the Brick Pits and the Desert so far.

Have a look see...

The Desert:


The Brick Pit:


Note the hex shaped depression at the top of the brick pit's berm. This is the spot for the number tile. I decided to go to a hex shape for the number counters for no other reasons than to be different. The number tiles will themselves actually be hex shaped cylinders about 3/8" or 1/2" thick.

The hex bases are 3" wide from edge to edge and are 1/2" thick. The desert is at most 1/2" tall above the top of the hex base, with the central flat area (the robber's starting point) being about 3/8" above the top of the hex base. The brick pit's berm extends 1/2" above the top of the hex base, and the pit's lowest level cuts about 7/16" down into the hex base.

My process for constructing these models, so far, has been to draw up a 2D and 3D wireframe in AutoCAD, then also in AutoCAD skin the model with regions and 3D faces. Once that's done, I import the model into Google SketchUp. This two step process helps me build very clean 3D models that should work much more effectively for creating the papercraft patterns.

Once my 3D models are built, my next step will be to pull the SketchUp models into a papercraft unfolding application, most likely Pepakura, to unfold the models and develop the 2D papercraft patterns. In reality, I'll probably take one of the recent models I built and run through the unfolding step soon, before I do a whole lot more on the 3D models; that way I can see how the model will unfold and adjust the current and future models appropriately if there are any quirks.

From there, the plan is to take the patterns into Inkscape for 'skinning' with color and imagery to create the end product papercraft patterns.

Lots of work ahead, but it's progressing well and I'm having fun doing it.

Tuesday, June 15, 2010

The Plot Unfolds

Amazingly, even over a year after my last post, this project has not yet died. In fact, I don't think any of my projects ever truly die; they just go into very deep hibernation.

I don't remember the events leading up to the discovery; but I found an image of another custom Settlers board, and in fact an Instructables Article on how it was made. This one was made from scrap plywood into an abstract, but very cool 3D board.


While I mulled over the possibilities of making a similar board, either out of plywood, or wood shapes from craft stores, my mind wandered over to another interest of mine, papercraft models, and a new direction for my custom 3D board appeared in my mind.

I will now develop my custom Settlers board and playing pieces as papercraft.

If well designed, and printed on suitably heavy cardstock, the hexes should stand up to reasonable abuse during play.

Weight of the pieces might be a minor issue; the hexes and game pieces could easily be knocked about or blown away. However, there are ways of dealing with that.

For example, suitably sized flat washers affixed in the hex bases can provide weight and stability. Strip magnets (like those used on the back of fridge magnets) could easily be used at the edges within the structure of the hexes to hold them together during play.

The game pieces can be weighted with small fishing sinkers or small nuts/washers and glue stuffed within each piece.

An advantage to the papercraft concept, apart from being unique, is that if a part is damaged; then replacement is relatively easy. Just print out a new copy and assemble.

The papercraft board and pieces is just concept at the moment; so I don't have any other goodies to share. But hopefully soon, I will have some conceptual models of the hexes built.

Wednesday, February 11, 2009

Developing Interest

So, with some small measure of work, I have managed to more or less get myself back to where I left after before my flash drive crash; and I even managed a little progress.

The hex tile number tokens, card backs, building cost card face, and resource cards faces are all rebuilt and waiting till I'm ready to print the cards.

The one and only element I did not rebuild was the soldier's face that I had started on. The reason I have not rebuilt the soldier's face is that it was far more detailed than necessary for the size the soldiers will end up on the cards; so I saw little point in going through all that work again for something that would not be very visible in the final product.

Instead, I chose to forge ahead with preparing the card faces for the development cards. All the development card faces, including the text, but excluding their illustrations, are done. I need only add their illustrations, and they'll be ready for printing. I've included the largest army and longest road cards among this development card set for purposes of getting them drawn up.

So now, what I expect to be the most difficult, longest, and most arduous task of all the card graphics work is now ahead of me; that being the illustrations for the development cards.

As I did before, I will likely begin with soliders. I've got at least three different soldiers I want to draw up; possibly a fourth, in fact. Is it more than necessary? Yes. But doing so will enrich the final product in the end, I think; so why not?

Saturday, February 7, 2009

Drawn of the Dead

Believe it or not this project is still not dead; it just goes into frequent hibernation.

I pulled my graphics files off my flash drive onto my laptop's hard drive, making them more conveniently accessed. Consequently, I've gotten back into the swing of rebuilding the card graphics again.

It's slow going; there's a lot to rebuild. The last couple of evenings saw me make progress in the form of rebuilt Card Back designs, and reasonable progress on rebuilding the resource card faces. The resource icons are done; they were fully recovered, thankfully. But the actual resource card faces were not fully recovered; on a positive note though, there was one complete resource card face, and a partially complete resource card face recovered after the flash drive crash.

Last night, I prepared all five resource card faces for completion. The titles, shield colors, and main icons are in place; all that remains to complete them is to appropriately revise the building cost lists in the lower banners. Where the resource card faces are concerned though, that's actually the tough bit.

Hopefully I'll get the resource card faces rebuilt this weekend, ready to move onto something else soon afterwards. I know I still have to rebuild the Hex Tile Number Chits; those will be easy enough once I get to them.

Well, enough rambling from me for now; I ought to get back to work on it all.

Wednesday, October 22, 2008

The 7 Month Itch

I've been sitting idle on this project for a few months now; but the itch to get back onto it is setting in. I've got a significant desire to get back to work on this project. I haven't even rebuilt all the graphics that I lost when my previous flash/micro drive died on me; so I think that's the place to start. I'm also considering moving my project wiki to the new GRHG portal, if for no other reason than to just get a bit more content in that portal.

I'll post more when I actually get something significant done on the graphics rebuild work.

Monday, May 26, 2008

We Can Rebuild It; We Have The Technology

So, the long work to rebuild the collection of graphics I had previously created started tonight. Fortunately, thanks in part to this blog, I at least have most of the graphics I created in raster iamge format, that I can use as guides to recreate the images as vector graphics in inkscape.

I started simple by recreating the 'Iroquois Confederacy' border pattern that appears on the card backs, and on the Building Cost cards. It's a small start; but it's a start nonetheless.

Wednesday, May 14, 2008

Lost, But Not At Sea

In a most horrible twist of fate, this custom settlers project has suffered a serious setback; the flash drive on which all of the latest graphics files for the project were stored is pooched! Of course, being the bonehead I can sometimes be, I haven't backed up the drive's contents for over six months.

I'm lucky enough to have a much older version of the icons SVG file on my office computer; that file, at the least has the complete version of all the icons, and the resource card face design for at least one card. The card back designs, the Building Costs cards, the tile number chits, and my soldier graphics are all gone. I've lost a whole lot of work. Fortunately, I've got the one working SVG file; I've still got a bunch of my original inspirational/resource images; and I've also got the images I've posted to this blog to help me rebuild all the graphics to the point I was just before the flash drive crapped out.

I'm discouraged; but I'm not giving up. I've already ordered my new flash drive; it's a solid state flash drive, which ought to be more reliable. I'm also gonna be more diligent in backing up my flash drive, from now on; at least once a week.

Once I get the new flash drive, I'm gonna transfer the few files I still have and rebuild the project folder so that I can get back to work on recreating the graphics I had already done, and continue the project.

Wednesday, April 16, 2008

An Eye for Details

I finally managed to get back to working on the graphics for this project; specifically, I'm still working on the soldiers.

I had previously done a lot of the fixes to the soldier's eyes, to make him look better. Today, I decided to rough out a soldier card, and print it out at actual size to see just how it looked. As suspected, the soldier, once on the card ends up being so small, that a fair bit of the detail I put into the face becomes indistinguishable. Furthermore, the soldier just doesn't have the same whimsical style as the icons; ideally, I think that's a style that I would like to maintain in some fashion throughout the game's artwork.

So, I think it's time to simplify my soldier before I get too far along on him and end up wasting countless hours on details that just won't be visible, and that will create an inconsistent look.

I don't have an image to show this time around; maybe next time.

Monday, March 24, 2008

Soldiering On

It's been a while since my last update. Between the overtime, and the not quite up to par new laptop, it's been difficult to make a lot of progress on this progress. I have been working on it though, a bit at a time.

I decided to go ahead and work on the graphics for the soldiers. That's been a very interesting learning experience. I've never been very good at drawing people before; but the work I've been doing on on my first soldier is causing me to rethink that opinion.

All I've got done so far is the face; I still have to add the hair and ears before moving on to the rest of the body. Nevertheless, the result is very encouraging so far. It's more realistic looking, and less iconic, than the resource icons; but I don't think that's such a bad thing.

Have a look see at what I've accomplished so far:


I don't know how many hours I've spent on this one face so far; it's quite a few, that's for sure.

Of all the graphics to be done for this game, I get the feeling the soldiers are gonna be the ones that take the longest to do.

I can't quite put my finger on what's wrong with the eyes; or rather, I know what's wrong with them, I just don't know exactly to to fix them. I'll be working on that soon.

Saturday, March 8, 2008

Aren't We Resourceful?

A couple of new developments to mention in this post; I'll start with the less visual one.

The playing card blanks arrived a couple days ago. They're thinner than I expected; reminiscent of playing cards you'd buy from a dollar store. However, it is definitely the kind of card stock that would be used for playing cards; so I've got high hopes for how things will turn out. The only thing that concerns me about the card sheets is the way the rounded corners of the cards are punched/perforated. The cards have a very tight perforation like most business card sheets; but the corners are not perforated, so much as they are punched, so the corners are kinda loose. I'm just hoping that doesn't pose a problem for the printer that I'll be using to print the cards.

Now that the cards sheets are in, I'm probably going to ramp up my search for a suitable coating medium. I may email the company from which I got the card sheets to find out what they recommend; in the abscence of the coating spray that they sell.

Now for the next bit of news, which still concerns the cards (gee, what a surprise). I finished up the design for the resource card faces. As I mentioned, I added a section at the bottom of the cards that shows the building costs for elements that can be purchased/built with each particular resource card. It looks pretty sharp, and should be nice and helpful. The icons in this bottom section are quite small, so much of the detail is lost; but when printed, they're still nicely legible enough to work.

Have a look see:


The resource card face design is pretty simple; it's the same shield shape as the logo on the back, with banners top and bottom for the resource name, and the building costs respectively. Simple, but elegant. I think this face design sets the precedent for the rest of the cards too.

So, other than finalizing the color of the card back patterns, I think that about finishes off the resource card designs; now to move on to the development cards. I'll probably design the five special development cards - the ones with the various buildings. I think those will be the easiest to design. Either that, or I'm gonna bite the bullet and get working in earnest on the soldiers. The way I figure it, I've got at least three designs to do for the soldiers; a french soldier, a british soldier, and an aboriginal/native soldier. I may want to do more than just one design of each though, so I might end up with a total of five or six designs. It's gonna be a lot of work, and I think that's why I'm reluctant to start the soldiers next.

Well, we'll see what I decide to start next, when I get to it; I'm ready to start the soldiers or some of the development cards.

Thursday, March 6, 2008

If You Build It, They Will Come.

I mostly finalized the Building Costs Card this morning. Have a look see:


It's simple and elegant, yet maintains the graphic theme used on the card backs. I didn't put a little graphic of the roads, settlements, or cities on the card; the reasons being that I would want to put on an actual photographic image of those 3D pieces - which are not yet constructed, and the card is smaller than the commercial game's version - since I'm opting to use the same playing card sized card for ALL the cards, including the special cards. I don't think the lack of graphic for the various buildable/purchasable elements is problematic in any way.

Now I'm moving on to the final design of the Resource Cards faces. I'm still debating whether or not I want to try to include a small banner at the bottom showing how each particular resource card can be used to build stuff. That'll take experimentation to see if it works out or not.

Tuesday, March 4, 2008

I'm Back In The Saddle Again!

Did some work on the card back design today.

The first step of that process was importing the Iroquois Confederacy flag graphic into Inkscape, and creating a pattern of sorts based on it. I made a few modifications to the pattern design. I gave the tree symbol at the centre smooth sides, as opposed to notched/variegated sides, and I centred all the elements along a horizontal axis instead of having some of the horizontal bands and the tree lower than other elements.

Remember that I'm placing my custom shield logo on this card back also; so the border pattern has to look good around that logo.

So, with the shield logo in place on the card back's centre, I then played around with how to arrange the pattern on the card back for best appearance. I first tried developing a border that would paralled the card back's perimeter; but it just didn't look quite right.

My next attempt, and the one that seemed to look quite good, was to put two bands of the pattern across the card back, one across the top, and one across the bottom. The pattern, both top and bottom, is oriented the same way; the shield logo is non symmetrical across the horizontal axis, so there seemed little point in mirroring the border pattern.

The final step was to determine the color of the card back's field and of the border. There are two distinct types of cards in the game, which in the commercial editions by Mayfair Games, uses different card backs to distinguish them. I figured I'd take a similar approach; it's logical. In my case, though, I decided to use the same card back design all around, and simply use colors as the differentiating aspect of the card backs.

I went in two directions with the card back colors. I first tried a colored field, with white border pattern, in a number of different muted colors; the resulting card backs look pretty good in my opinion - but I'm probably biased. Check them out:


I then tried a white field with brightly/dark colored border patterns; this turned out quite nice too. Check them out:


So, now it seems that I have ten viable card back designs, but I only need two; maybe a third one for the building cost cards, and the special cards - the largest army, and longest road cards.

The bulk of the cards will be resource cards, and development cards - only two card types; so I think the best solution will be to use one back with a colored field one of the card types, and one back with a white field for the other card type, then choose yet a different back for the special cards.

I'll decide on the specific color choice later; but I'm leaning towards purple 'cause that's my favorite color.

I'd like Economics of Art for 400, Alex.

I realized recently, that when compared to the standard set of Settlers of Catan by Mayfair Games, my purchases for this project have already surpassed the cost to purchase it. This isn't suprising; it was pretty much a given that this would happen.

However, the real benchmark will be comparing the cost of this project to Mayfair's 10th Anniversary 3D edition of the game. It's the most appropirate comparison.

The comparison will encompass only the ecomonic aspect of the project; how much it costs me to produce my set of Settlers, compared to the cost of buying a 10th Anniversary set. There will be no comparison in terms of the detail of the 3D sculpture, or similar aspects; I'm going for a very different look to my set - particularly, a more cartoony look to the 3D sculpted pieces.

Looking around online game stores it seems that the average price for a set of the 10th Anniversary 3D Settlers of Catan is about $400. Add taxes to that and we end up with an approximate total of $450.

So, that's my benchmark. Will I be able to produce this 3D set of Settlers of Catan for $450 or less?

I've probably got just a little bit of equipment still to buy; but not much. I'm mostly set up and ready to go for the cards. I just need to look for and buy Clear Satin Acrylic Sealer/Finish; that'll be relatively easy to find.

Other than that, most of what I need to buy is more Fimo poly clay. Given the quantities I need, I'll be looking for deals wherever I can get them. But if anything is going to push me over the $450 dollar mark, the Fimo clay will do it.

It should be interesting to see how it all works out in the end.

Sunday, March 2, 2008

Pasta Point of No Return

Wow, what a day! I went and did some shopping around looking for hex shaped cookie cutters and a pasta machine. I never did find hex shaped cookie cutters; I may have to go online to get some of those. But then, that's if I even decide to go the cookie cutter method after all.

What I did find today though was a crazy deal on a pasta machine and a whole pile of Fimo soft poly clay.

The day started with a trip to Fairview Park Mall only to find out that the Castle & Barnes housewares store that used to be there is gone. Since I was at the mall, I decided to check out Wal-Mart; that was a bust, but unsurprisingly so.

From there I headed to Sunrise Shopping Centre at the opposite end of Kitchener and checked out Benix & Co. - who were having an inventory clearance sale, Bulk Barn - who does carry cake decorating and candy making equipment and supplies, and finally Linens & Things; that trip turned out 0 for 3.

I passed by S.T.O.P. restaurant supply; but they're closed on Sundays. So being in the area, I decided to check out Herrschnerrs craft shop. My wife, Carrie was with me, and I knew she'd be happy to check out yarns, and stuff; so it seemed like a good idea.

Was it ever a good idea! Due to poor demand, Herrschnerrs stopped carrying Fimo poly clay, and related equipment. However, they still had a couple of used pasta machines in the back room that they used for craft classes they provide; they sold me one for ten dollars. At their cheapest, such pasta machines are thirty dollars; usually, up here in Canada, they tend to go for forty or more. That was a great deal in itself; but it got better.

Although they returned most of their Fimo stock to the manufacturer; they still had a small stock of it left in their clearance area. They had a bunch of the standard 56g blocks on sale for twenty-five cents, and a few large 350g blocks on sale for around six dollars. Around here, these packages sell for around three dollars, and seventeen dollars respectively. I started off with just a few blocks of Fimo, 'cause I didn't have a whole lot of money to spend. But in passing, while the cashier - who I guess is also the manager or some such - was starting to ring up our purchase, I asked if she'd make me a deal on cleaning them out of their entire stock of Fimo clay. Since they no longer carry the product, I figured that she'd probably be receptive to not having to have this little remaining bit in inventory. My hunch was right; she offered to sell me the remaining stock for just a couple dollars more than the few blocks she had already rung in at their already discounted price.

All in all, I got five large blocks of Fimo Soft in varying colors, and at least fifteen of the small blocks mostly in yellow, but with a few other colors also, all for less than twenty-five dollars. Essentially, I got over $130 worth of Fimo for a bit over twenty bucks; that's a frikkin' deal.

It's true, not all of the colors of the clay are quite what I would have chosen in thefirst place; but colors of Fimo clay can be mixed to create new colors, so I'm sure it'll work out in the long run. Besides, I can use some of the less desirable colors as underlying build-up layers to be covered by the finish layers on many of the scuplted pieces; or failing that, I can keep it for other crafts that I might decide to do with my young son Alex.

The colors of Fimo that I have now have put me in a position that I can probably starting planning and building some of the game pieces - the roads, settlements, and cities - for the game.

The project is really taking on a sense of definitive reality now that there's more going on than just cute little graphics.

Saturday, March 1, 2008

I Must Be Getting Soft

A few items to post about tonight:

First, I went and checked out what was available at Hobby and Toy Central, here in Kitchener, regarding Fimo polymer clay. All they had in stock was Fimo Soft; that was a bit disappointing, 'cause I'd prefer to use Fimo Classic. Fimo Classic, which is stiffer to start with, and needs more working to make it more easily malleable, is also supposedly more durable after it's baked/cured.

So, not finding Fimo Classic in stock, I inquired if they could special order it. It turns out that Fimo Classic has been discontinued; so Fimo soft if gona be the product of... well, necessity, I suppose. It'll do, I guess. I bought two 54g (2oz.) blocks so that I could play around, experiment, and get familiar with working with Fimo, as well as what it's like once it's baked/cured.

On that note, I suppose I ought to mention that since I've started buying material and equipment for the project, I've added a table, keeping track of all the money I spend on the project, to the porject wiki over at ForgedRPG.

Next, as I prepare to start drawing up my soldiers for the development cards, I've been scouring the net hard for decent pictures of colonial era soliers, predominantly french soldiers, to use as inspiration. As part of this search, I've been checking some north-american history, particularly regarding the french-indian war, which was a war of key significance in Canada's history. Also as part of this search, I've been looking for pictures of aboriginal warriors of the era, and french and british soldiers of the era.

Well, I found out that key aboriginals involved in the conflicts of this era were the tribes of the Iroquois Confederacy. The Iroquois Confederacy consists of the Mohawk, Oneida, Onondaga, Cayuga, Seneca, and the Tuscarora. The flag of the Iroquois Confederacy, which is based on an ancient belt of wampum is shown below.


I also found a few, well at least a couple, of good pics of aboriginal warriors - mohawk and oneida, I believe. So added to the inspirational pics of the french and british colonial soldiers I've got, I've got a solid basis to draw a series of soldiers that will be a tribute to the french, british, and aboriginal origins of this great Canadian nation.

Since I'll be going ahead with drawing aboriginal warriors (and british) in addition to the french soldiers, I've decided to use the motif of the Iroquois Confederacy flag in some way on the cards, most likely as a sort of border around the cards.

Well, I think that covers everything I wanted to mention in this update. Stay tuned.

Friday, February 29, 2008

At Arms Length

As I mentioned previously, I planned on using my personal arms (unofficial, and currently only a shield without foundation, supporters, mantle, or crest as the basis for my custom Settlers of Catan logo.

Described in layman's terms, my personal arms would be a two swans facing each other, swimming on rolling water, above a broad white stripe on which rests a signle purple ring, all atop a purple field - the field being the entire face of the shield.

To customize it for my Settlers of Catan build, I removed the white stripe and purple ring, and instead put a rising sun at the base of the shield.

I think it looks pretty cool, and will look really sharp on the card backs. As an aside, the card backs, are another element I have to think about; there are multiple types of cards in the game that will each need a distinct card back design. It'll probably be a simple matter of using different background colors behind the shield and whatever other embellishments I decide to put on the card backs.

In any case, have a look see: