Wednesday, January 16, 2013

The Yellow Brick Road

Believe it or not, this project is not dead; it's just in a coma. But there are signs of possible waking up.

The Papercraft direction, though still a direction I like in concept, has some practical problems. Durability is a concern. And frankly, just coming up with viable hex designs has been a long and arduous process; let alone actually unfolding the 3D models into flat templates, then skinning them appropriately, then printing and building them. The most appealing aspect of the papercraft board concept is the price; it would be very economical to create.

However, today, I discovered something really cool that has me thinking of creating the board in a totally different way. I can sum up the concept in one word... LEGO! Behold this LEGO Settlers of Catan board:


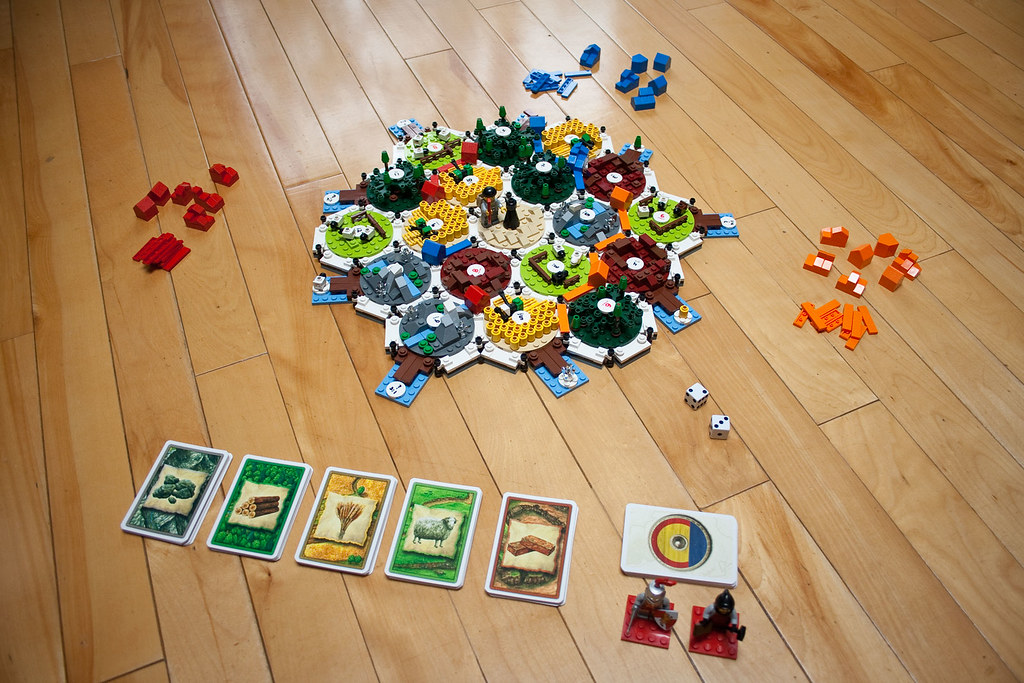
How cool is that?! the 'hex tiles' are actually round in this case, being built on 6x6 round plates. More photos can be found at Michael Thomas' (the creator of this here LEGO SoC board) flickr stream.

Just from the photos, it's fairly easy to figure out how it's built and the pieces required.

Although it's a significantly more expensive board option than the papercraft, it would be significantly easier to build and also be much more durable. The biggest challenge in creating this kind of board would be purchasing all the required pieces; but bricklink.com and various other online resources would be very helpful there.

So, this have now become my new direction on this project; and heck, I may even decide to redesign the cards for a LEGO-centric theme. But that's a decision I'll save for later.

Wednesday, June 30, 2010

Seeing the Forest for the Trees

I managed to do a whole lot more modelling of the papercraft hexes and such recently. So much so, in fact, that I've essentially completed the 3D modelling of the hexes; though I may revisit one or two models to clean them up a bit.

My remaining hexes were the Fields, Forests, Seas, and Harbours. They are now done; here they are for you viewing pleasure.


Keep in mind that these models are not showing their final skins; they're merely showing their shape. The actual final skins will be drawn onto them, using Inkscape, after they're unfolded.

And so, now there are two possible avenues for continuing work. I can either continue to finalize the hexes by going through the unfolding process and then importing them to Inkscape to skin them; or I can continue the modelling work by constructing the playing pieces - the roads, villages, cities, hex number blocks, resource type blocks, and so on.

I'm in the 3D modelling groove right now; so I think I'm leaning towards the latter course of action.

Thursday, June 24, 2010

Climb Every Mountain,...

I figured it wouldn't take me very long to finish my 3D model for the mountains hex; and I was right. This hex is the tallest one of the bunch. I tried to create a semblance of snow caps at the peaks; but there's only so much I can do with the basic Sketchup features. I'll be drawing on some proper snow caps once I import the unfolded pattern into Inkscape for final skinning.


With the mountains done, I'm left with fields, forests, harbors, and the border seas to do. I haven't decided which I'm going to tackle next. I might do fields next.

The Hills DO NOT Have Eyes!

I finished the 3D model for the Hills hex today. Check it out...


I'll probably eventually design some tiny little sheep to go onto the hill; but that's detail work for later.

For now, I've moved on to building the model for the mountains. I've got the wireframe finished; my next steps are to draw 3D Faces onto the wireframe and then import it into Sketchup. I'll probably have a pic of that model soon.

Tuesday, June 22, 2010

I Am the Very Model of a Modern... Hex?!

Over the past few days, I've been working on building the 3D Models for my Papercraft parts for the game. I've started with the board hexes. I've completed the models for the Brick Pits and the Desert so far.

Have a look see...

The Desert:


The Brick Pit:


Note the hex shaped depression at the top of the brick pit's berm. This is the spot for the number tile. I decided to go to a hex shape for the number counters for no other reasons than to be different. The number tiles will themselves actually be hex shaped cylinders about 3/8" or 1/2" thick.

The hex bases are 3" wide from edge to edge and are 1/2" thick. The desert is at most 1/2" tall above the top of the hex base, with the central flat area (the robber's starting point) being about 3/8" above the top of the hex base. The brick pit's berm extends 1/2" above the top of the hex base, and the pit's lowest level cuts about 7/16" down into the hex base.

My process for constructing these models, so far, has been to draw up a 2D and 3D wireframe in AutoCAD, then also in AutoCAD skin the model with regions and 3D faces. Once that's done, I import the model into Google SketchUp. This two step process helps me build very clean 3D models that should work much more effectively for creating the papercraft patterns.

Once my 3D models are built, my next step will be to pull the SketchUp models into a papercraft unfolding application, most likely Pepakura, to unfold the models and develop the 2D papercraft patterns. In reality, I'll probably take one of the recent models I built and run through the unfolding step soon, before I do a whole lot more on the 3D models; that way I can see how the model will unfold and adjust the current and future models appropriately if there are any quirks.

From there, the plan is to take the patterns into Inkscape for 'skinning' with color and imagery to create the end product papercraft patterns.

Lots of work ahead, but it's progressing well and I'm having fun doing it.

Tuesday, June 15, 2010

The Plot Unfolds

Amazingly, even over a year after my last post, this project has not yet died. In fact, I don't think any of my projects ever truly die; they just go into very deep hibernation.

I don't remember the events leading up to the discovery; but I found an image of another custom Settlers board, and in fact an Instructables Article on how it was made. This one was made from scrap plywood into an abstract, but very cool 3D board.


While I mulled over the possibilities of making a similar board, either out of plywood, or wood shapes from craft stores, my mind wandered over to another interest of mine, papercraft models, and a new direction for my custom 3D board appeared in my mind.

I will now develop my custom Settlers board and playing pieces as papercraft.

If well designed, and printed on suitably heavy cardstock, the hexes should stand up to reasonable abuse during play.

Weight of the pieces might be a minor issue; the hexes and game pieces could easily be knocked about or blown away. However, there are ways of dealing with that.

For example, suitably sized flat washers affixed in the hex bases can provide weight and stability. Strip magnets (like those used on the back of fridge magnets) could easily be used at the edges within the structure of the hexes to hold them together during play.

The game pieces can be weighted with small fishing sinkers or small nuts/washers and glue stuffed within each piece.

An advantage to the papercraft concept, apart from being unique, is that if a part is damaged; then replacement is relatively easy. Just print out a new copy and assemble.

The papercraft board and pieces is just concept at the moment; so I don't have any other goodies to share. But hopefully soon, I will have some conceptual models of the hexes built.

Wednesday, February 11, 2009

Developing Interest

So, with some small measure of work, I have managed to more or less get myself back to where I left after before my flash drive crash; and I even managed a little progress.

The hex tile number tokens, card backs, building cost card face, and resource cards faces are all rebuilt and waiting till I'm ready to print the cards.

The one and only element I did not rebuild was the soldier's face that I had started on. The reason I have not rebuilt the soldier's face is that it was far more detailed than necessary for the size the soldiers will end up on the cards; so I saw little point in going through all that work again for something that would not be very visible in the final product.

Instead, I chose to forge ahead with preparing the card faces for the development cards. All the development card faces, including the text, but excluding their illustrations, are done. I need only add their illustrations, and they'll be ready for printing. I've included the largest army and longest road cards among this development card set for purposes of getting them drawn up.

So now, what I expect to be the most difficult, longest, and most arduous task of all the card graphics work is now ahead of me; that being the illustrations for the development cards.

As I did before, I will likely begin with soliders. I've got at least three different soldiers I want to draw up; possibly a fourth, in fact. Is it more than necessary? Yes. But doing so will enrich the final product in the end, I think; so why not?